Planning and Selections
Custom Home Selections Checklist for Winter Park
By Rare Builders · Published
What to decide before orders, cabinet fabrication and rough-ins
A kitchen can look settled on a floor plan while important decisions are still open. The refrigerator may need custom panels. The sink may change the cabinet below it. A pendant may need to move when the island is drawn at its final size.
For a custom home in Winter Park, a useful selections checklist connects each choice to the work it controls. That includes the rooms inside and the covered spaces outside. Start with the decisions that affect drawings, openings, concealed systems and fabrication. Then give the remaining finishes clear deadlines of their own.
The question to ask at each meeting is simple: “What work cannot move forward until this decision is resolved?”
Build the list around the next commitment
Different selections become urgent at different points. Your builder should tie dates to the actual schedule and supplier information rather than use a single deadline for every room.
- Before design and permit drawings are finalized: resolve layouts, major openings, structural implications and building-system requirements with the design team. Later changes may require revised drawings or additional review.
- Before a purchase order is released: confirm the exact product, configuration, dimensions, finish, delivery terms and the drawings it must match. Some windows, doors or specialty equipment may need attention well before interior rough-ins.
- Before cabinetry or other custom work is fabricated: approve coordinated shop drawings and the products that fit into, attach to or sit beside that work.
- Before rough-ins: confirm locations and requirements for the plumbing, electrical and mechanical work that will later be concealed. A rough-in installs the early piping, wiring and related provisions before final fixtures and finishes.
- Before finish installation: resolve layout, edges, transitions, samples and quantities for the specific work being released.
These checkpoints can overlap. Choosing a finish, approving a drawing and placing an order are separate events; record each one.
Coordinate the kitchen as one package
Begin with the exact appliance models and their current installation documents. “Panel-ready refrigerator” or “36-inch range” does not provide enough information to release cabinetry. Opening sizes, clearances, panel requirements, ventilation and utility locations depend on the selected products.
Sub-Zero’s design-guide resources, for example, address panel dimensions, opening dimensions and door clearance. The useful lesson is to use the instructions for the actual model, including any required accessories, rather than assume similar-looking products fit the same way.
Before cabinet approval, review these together:
- Appliance models, door swings, adjacent walls, fillers and handle clearance
- Sink model, bowl arrangement, mounting method and compatibility with the sink cabinet
- Faucet and accessory locations, including any holes required in the countertop
- Cabinet elevations, storage interiors and finished panel details
- Countertop material, edge, seams, supports and transitions that affect the design
- Island size and seating arrangement, coordinated with lighting and electrical provisions
Have the designer, cabinet supplier and installing trades reconcile the drawings. A sample-board approval confirms appearance; it does not establish that the appliances, cabinetry and services have been coordinated.
Before countertop templating, ask the fabricator what must be installed, approved and physically available. Cambria’s installation guidance, for example, calls for permanent cabinet installation before final measurements and addresses the availability of sinks, faucets and appliances. Confirm your fabricator’s requirements, including cutouts and who approves the template, before booking that step.
Resolve bathrooms before the walls close
In a bathroom, a visible fixture can depend on a concealed part selected much earlier. Confirm the valve body and compatible trim, not just the faucet finish. Establish the intended finished-wall assembly so the installer can set the product to its required depth.
Delta’s MultiChoice valve installation instructions illustrate why wall type and thickness matter. Other products have different requirements; the installing plumber must follow the selected system’s instructions.
Bring the vanity, sink, faucet, mirror and lighting into the same review. A wall-mounted faucet needs a planned relationship to the basin. A mirror cabinet may need a recess, support or power. A vanity drawer can conflict with a drain location if the two are considered separately.
For showers, coordinate the drain, waterproofing approach, floor buildup, tile layout, niches and glass interfaces with the design team and installers. This checklist is a prompt for that review, not a substitute for an approved assembly or installation detail. Avoid covering work until the required checks and inspections are complete.
Include the ceiling and the outdoor room
Lighting selections need more than a fixture photograph. Review fixture size and location against beams, ceiling details, cabinetry, doors and furniture. Confirm controls and dimming compatibility for the actual products, along with access to drivers or other components that may need service.
Where lighting meets custom woodwork, the fixture and millwork details must agree. Lutron’s downlight installation resources provide product-specific details for this review. Cutouts and mounting conditions vary by fixture and installation type.
Carry the same discipline outside. On a Winter Park home with a covered terrace or summer kitchen, review cooking equipment, ventilation requirements, utilities, lighting, fans, drainage and maintenance access before the adjoining construction is committed. Confirm that each product and installation is suitable for its location.
Rare Builders’ completed Spring residence in Winter Park shows living spaces arranged around a courtyard pool and sheltered outdoor areas. Those visible connections are a useful reminder to consider indoor and outdoor decisions together.
For your own covered outdoor room, check the fan’s exact position before choosing it. Could wind-driven rain reach it near the roof edge? Hunter’s outdoor-fan guidance distinguishes damp-rated fans protected from direct rain from wet-rated fans designed for direct water exposure. A roof alone does not settle the choice. Have the installer confirm the selected model and controls for that location before electrical provisions are finalized. At the adjoining indoor-outdoor threshold, also review door operation, water management and finish transitions before releasing doors and flooring.
Keep one decision record everyone can use
A useful record gives each selection a room, an exact product or drawing reference, a responsible person and a deadline tied to the next task. Include the current revision and a link to the supporting specification or approved sample.
Track these statuses separately:
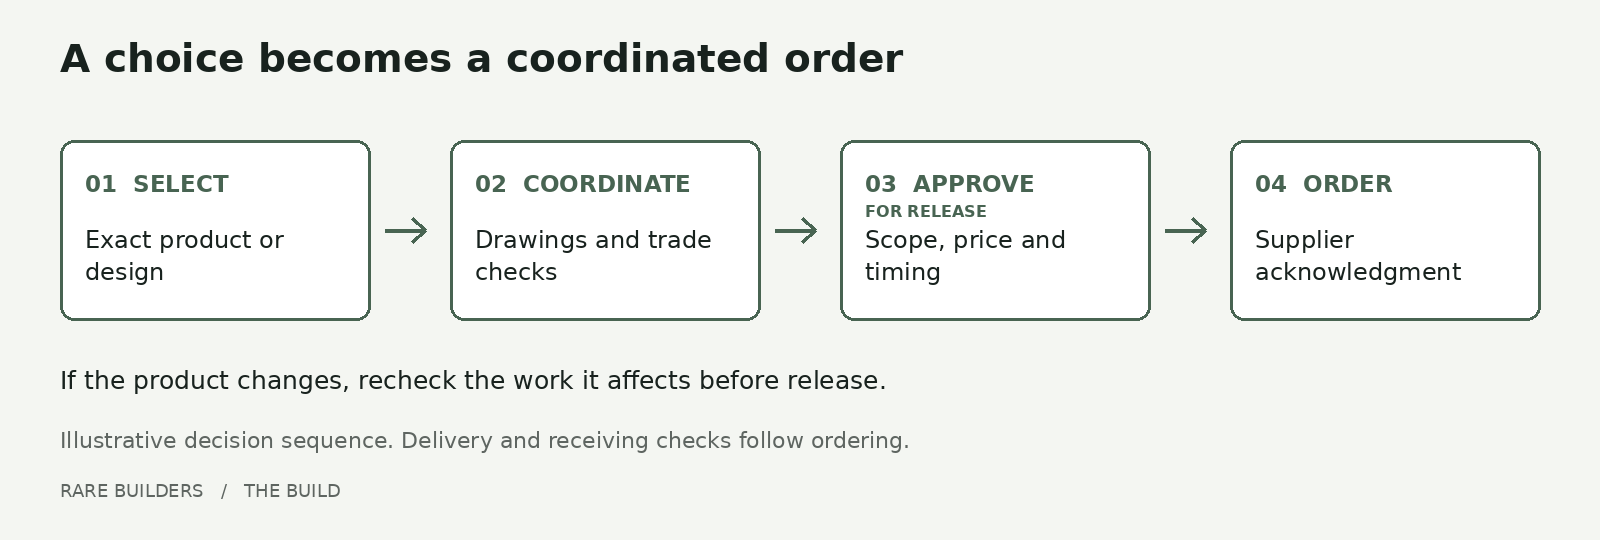
- Selected: the owner has chosen the intended product or design.
- Coordinated: the relevant drawings, dimensions and trade requirements agree.
- Approved for release: the authorized person has approved the defined scope, price and schedule implications under the project’s process.
- Ordered: the supplier has acknowledged the exact order and stated delivery information.
Delivery and receiving checks still come afterward. A selection marked “approved” should not silently stand in for a purchase order or a confirmed arrival.
Ask the supplier what starts the quoted lead time and whether a deposit, approved drawings or field measurements are required first. Visual Comfort’s delivery guidance, for example, distinguishes product availability from shipping time. Record the date and conditions of the quote. Work backward from when the product is needed, allowing for the actual review, fabrication, delivery and checking steps; there is no single reliable lead time for all custom homes.
A kitchen example to work through with your team
Illustrative example: the owner chooses panel-ready refrigeration after the first cabinet elevations have been drawn. The cabinet order has not yet been released.
The next step is to obtain the exact model’s planning documents. The cabinet supplier checks the opening, panels, adjacent cabinetry and door operation. The installing trades verify the required services. The owner reviews the revised appearance and any price or schedule changes. The designated approver can then release that scope.
In the decision record, “refrigerator selected” is therefore only the first status. Until those checks are complete, the affected cabinet section remains on hold. If the appliance later changes, reopen that coordination review before substituting it.
Download the selections worksheet for a worked record and a blank version to use for your own decision. Start with the item most likely to hold up the next order or installation.
Questions to ask at your next meeting
Do all finishes need to be chosen before construction starts?
The choices affecting design, approvals, orders or concealed work need to be resolved before those commitments. Other choices can follow an agreed schedule. Ask your builder which decisions are critical now and what can genuinely wait.
Does an allowance mean a selection is complete?
An allowance is a budget provision defined by your agreement. It does not identify the final product or confirm compatibility, availability, installation scope or final cost. Record the actual selection and its approval separately.
What if a selected item becomes unavailable?
Ask the team to compare the proposed replacement’s dimensions, appearance, required services, installation details, price and delivery. A similar description or nominal size does not establish equivalence.
Plan your Winter Park home
The goal is to make decisions early enough that the design, pricing, orders and field work can stay aligned. A short, current list of unresolved items is more useful than a long checklist with unclear approvals.
Explore Rare Builders’ custom homes in Winter Park and The Build process. To discuss a new residence, contact Rare Builders with your plans, priorities and the decisions you are working through.
Product requirements and project conditions vary. Your design professionals, builder and installing trades should confirm the applicable requirements for the specific home and products.